copy and pest
inside a method eg button click
private void button1_Click(object sender, EventArgs e)
{
DialogResult result=dialog.ShowDialog();
if(result==DialogResult.OK)
{
buff=System.IO.File.ReadAllBytes(dialog.FileName);
labelfilename.Text=dialog.FileName;
}
}
otherwise
OpenFileDialog dialog;
DialogResult result=dialog.ShowDialog();
if(result==DialogResult.OK)
{
buff=System.IO.File.ReadAllBytes(dialog.FileName);
labelfilename.Text=dialog.FileName;
}
Sunday, 4 January 2015

C# Retrieving Values From A local Database
i assume you have already watched the previous tutorial
if you havent then check this out
http://icytrey.blogspot.com/2015/01/c-easiest-way-to-connect-to-local.html
and can connect to your local database without any problems
just copy and paste its not a crime
System.Data.SqlClient.SqlConnection con;
con = new System.Data.SqlClient.SqlConnection();
con.ConnectionString = @"Data Source=(LocalDB)\v11.0;
AttachDbFilename=C:\Users\icytrey\documents\visual studio 2013\Projects\PdfToWordDocument\PdfToWordDocument\MysimpleDatabase.mdf;
Integrated Security=True;
Connect Timeout=30;";
con.Open();
SqlCommand command = new SqlCommand("select * from Movies", con);
SqlDataReader reader = command.ExecuteReader();
while (reader.Read())
{
int Id = reader.GetInt32(0);
String name = reader.GetString(1);
String categoruy= reader.GetString(2);
listBox1.Items.Add(name);
}
con.Close();
if you havent then check this out
http://icytrey.blogspot.com/2015/01/c-easiest-way-to-connect-to-local.html
and can connect to your local database without any problems
just copy and paste its not a crime
System.Data.SqlClient.SqlConnection con;
con = new System.Data.SqlClient.SqlConnection();
con.ConnectionString = @"Data Source=(LocalDB)\v11.0;
AttachDbFilename=C:\Users\icytrey\documents\visual studio 2013\Projects\PdfToWordDocument\PdfToWordDocument\MysimpleDatabase.mdf;
Integrated Security=True;
Connect Timeout=30;";
con.Open();
SqlCommand command = new SqlCommand("select * from Movies", con);
SqlDataReader reader = command.ExecuteReader();
while (reader.Read())
{
int Id = reader.GetInt32(0);
String name = reader.GetString(1);
String categoruy= reader.GetString(2);
listBox1.Items.Add(name);
}
con.Close();
C# EASIEST WAY TO CONNECT TO A LOCAL DATABASE
i spent close to one full year doing this till i suceded and thought of making a simple tutorial that can help alot of my brothers out there
Follow These steps and you will insert to a database
1 First all right click on your project
as shown below


then add new item
step 3 click add new item and select Service based database i called mine blogger.mdf

step 4 click add and wait for the system to create after creation
double click on the database
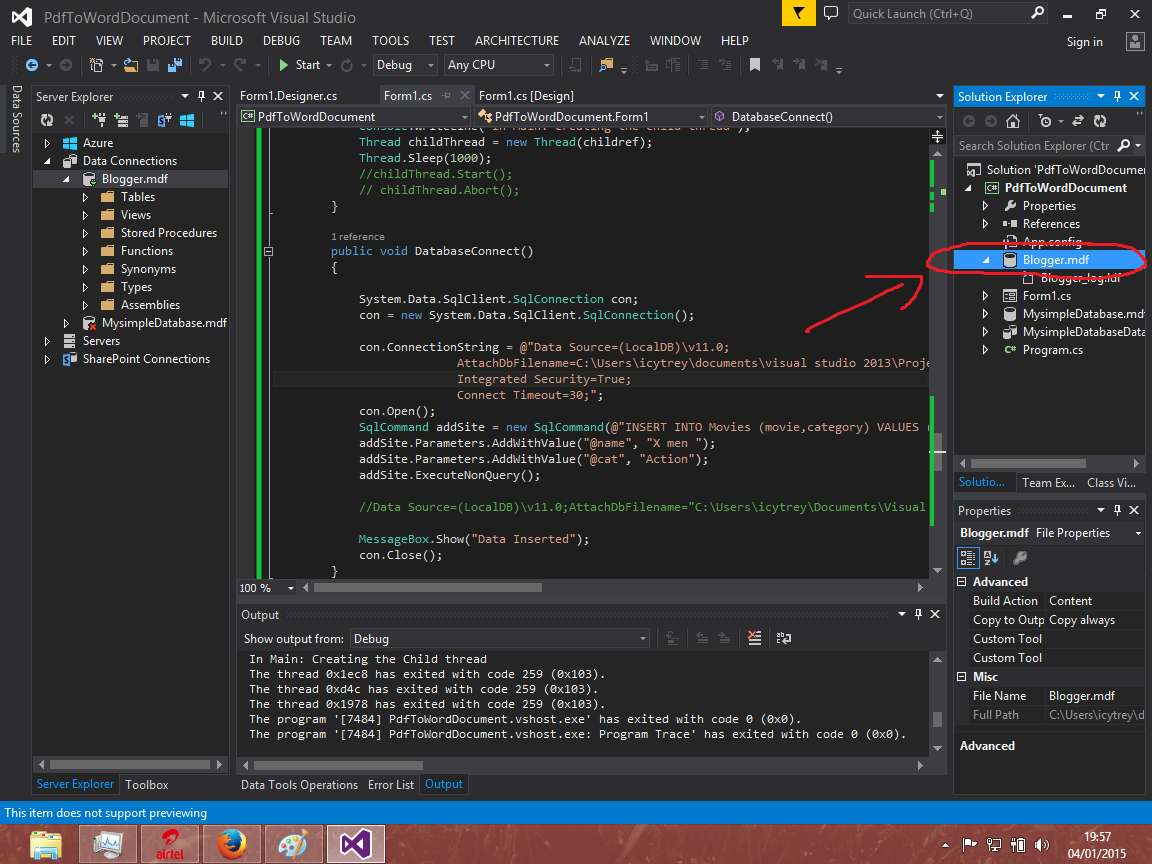 this will open the database in the server explorer located on the top left corner of visual studio 2013
as shown below
then right click on the as shown below and choose modify

step 5 you will see this
 change the data source to Microsoft SQL Server Database File (SqlClient)
and locate your database
after this
This is where we all get it wrong the data source is not always .\SQLEXPRESS as most tutorials give
click advanced and you will be greeted with all the information you are going to need to connect to the database
con.ConnectionString = @"Data Source=(LocalDB)\v11.0;
AttachDbFilename=C:\Users\icytrey\documents\visual studio 2013\Projects\PdfToWordDocument\PdfToWordDocument\MysimpleDatabase.mdf;
Integrated Security=True;
Connect Timeout=30;";
note AttachDbFilename locate your database.mdf file in the path

then you are almost done
here is the complete code
System.Data.SqlClient.SqlConnection con;
con = new System.Data.SqlClient.SqlConnection();
con.ConnectionString = @"Data Source=(LocalDB)\v11.0;
AttachDbFilename=C:\Users\icytrey\documents\visual studio 2013\Projects\PdfToWordDocument\PdfToWordDocument\MysimpleDatabase.mdf;
Integrated Security=True;
Connect Timeout=30;";
con.Open();
SqlCommand addSite = new SqlCommand(@"INSERT INTO Movies (movie,category) VALUES (@name,@cat)", con);
addSite.Parameters.AddWithValue("@name", "X men ");
addSite.Parameters.AddWithValue("@cat", "Action");
addSite.ExecuteNonQuery();
//Data Source=(LocalDB)\v11.0;AttachDbFilename="C:\Users\icytrey\Documents\Visual Studio 2013\Projects\PdfToWordDocument\PdfToWordDocument\MysimpleDatabase.mdf";Integrated Security=True;Connect Timeout=30
MessageBox.Show("Data Inserted");
con.Close();
create the table by expanding the database right click on Tables as shown below

last step you will be greeted with this interface create the table and hit update icon
and you are done
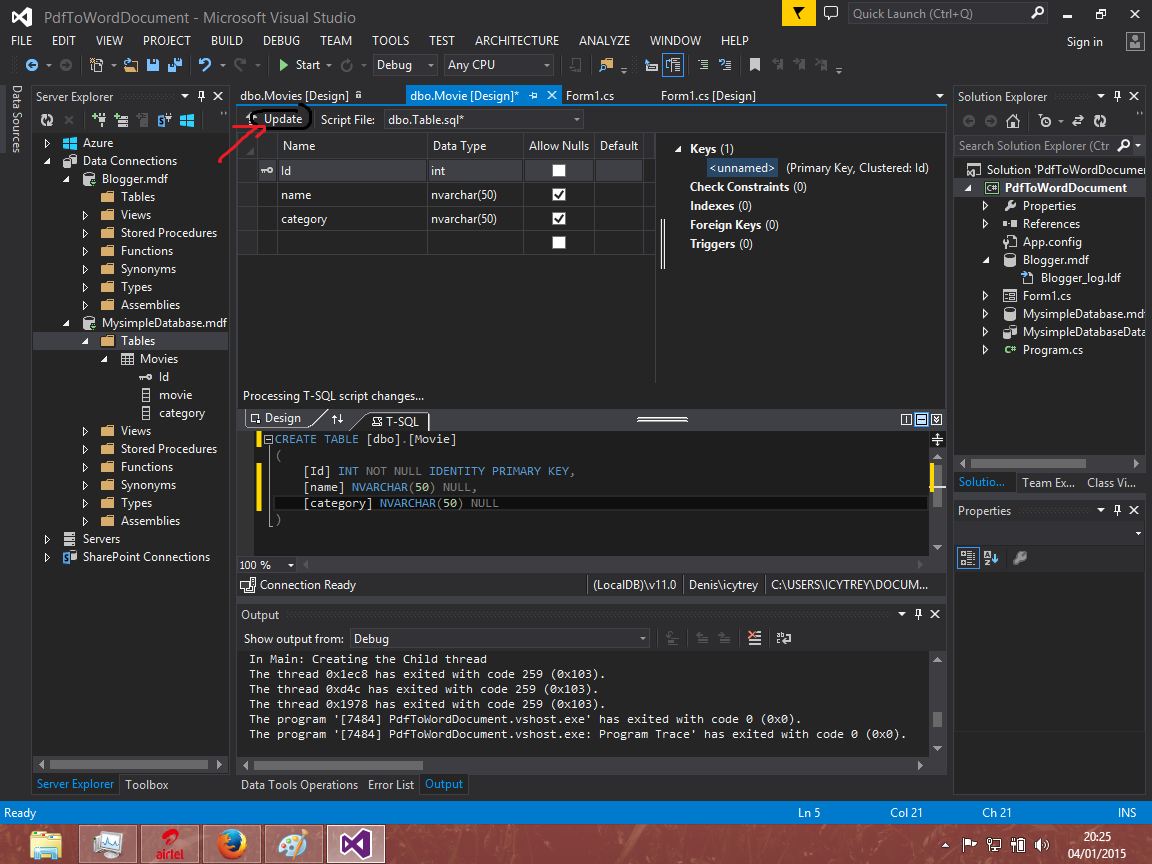
dont forget to make id IDENTITY PRIMARY KEY
thanks hope this helps you alot
Follow These steps and you will insert to a database
1 First all right click on your project
as shown below
then add new item
step 3 click add new item and select Service based database i called mine blogger.mdf
step 4 click add and wait for the system to create after creation
double click on the database
as shown below
then right click on the as shown below and choose modify
step 5 you will see this
and locate your database
after this
This is where we all get it wrong the data source is not always .\SQLEXPRESS as most tutorials give
click advanced and you will be greeted with all the information you are going to need to connect to the database
con.ConnectionString = @"Data Source=(LocalDB)\v11.0;
AttachDbFilename=C:\Users\icytrey\documents\visual studio 2013\Projects\PdfToWordDocument\PdfToWordDocument\MysimpleDatabase.mdf;
Integrated Security=True;
Connect Timeout=30;";
note AttachDbFilename locate your database.mdf file in the path
then you are almost done
here is the complete code
System.Data.SqlClient.SqlConnection con;
con = new System.Data.SqlClient.SqlConnection();
con.ConnectionString = @"Data Source=(LocalDB)\v11.0;
AttachDbFilename=C:\Users\icytrey\documents\visual studio 2013\Projects\PdfToWordDocument\PdfToWordDocument\MysimpleDatabase.mdf;
Integrated Security=True;
Connect Timeout=30;";
con.Open();
SqlCommand addSite = new SqlCommand(@"INSERT INTO Movies (movie,category) VALUES (@name,@cat)", con);
addSite.Parameters.AddWithValue("@name", "X men ");
addSite.Parameters.AddWithValue("@cat", "Action");
addSite.ExecuteNonQuery();
//Data Source=(LocalDB)\v11.0;AttachDbFilename="C:\Users\icytrey\Documents\Visual Studio 2013\Projects\PdfToWordDocument\PdfToWordDocument\MysimpleDatabase.mdf";Integrated Security=True;Connect Timeout=30
MessageBox.Show("Data Inserted");
con.Close();
create the table by expanding the database right click on Tables as shown below
last step you will be greeted with this interface create the table and hit update icon
and you are done
dont forget to make id IDENTITY PRIMARY KEY
thanks hope this helps you alot
Friday, 30 May 2014
Better way to insert in to mysql from android application
I THINK WITH CONFIGURATIONS AND MINOR CHANGES THIS SHOULD HELP YOU
first you need to set up php
//androidmysql is the project folder in your localhost
make sure the php file contains no html tags for better results
leave it plain
conn.php
<?php
$connect=mysql_connect("localhost","root","");
$mysql_select_db("users",$connect);
?>
dont forget to create database users and table user with username and password
here is the insert.php
<?php
include conn.php
$user=$_POST['username'];
$pass=$_POST['password'];
//these are posted fromandroid application
$sql=mysql_query("insert into user(username,password) values ('$user','$pass')");
//you are done
if($sql)
{
$output['success']=1;
json_encode($output);
print(json_encode($output))
}
if(!$sql)
{
$output['success']=2;
json_encode($output);
print(json_encode($output))
}
?>
Now lets go to android
android manifest
<?xml version="1.0" encoding="utf-8"?>
<manifest xmlns:android="http://schemas.android.com/apk/res/android"
package="com.example.anroidmysql"
android:versionCode="1"
android:versionName="1.0" >
<uses-sdk
android:minSdkVersion="8"
android:targetSdkVersion="18" />
<uses-permission android:name="android.permission.INTERNET"/>
<application
android:allowBackup="true"
android:icon="@drawable/ic_launcher"
android:label="@string/app_name"
android:theme="@style/AppTheme" >
<activity
android:name="com.example.anroidmysql.MainActivity"
android:label="@string/app_name" >
<intent-filter>
<action android:name="android.intent.action.MAIN" />
<category android:name="android.intent.category.LAUNCHER" />
</intent-filter>
</activity>
</application>
</manifest>
import java.io.IOException;
import java.util.ArrayList;
import java.util.List;
import org.apache.http.HttpEntity;
import org.apache.http.HttpResponse;
import org.apache.http.NameValuePair;
import org.apache.http.client.ClientProtocolException;
import org.apache.http.client.entity.UrlEncodedFormEntity;
import org.apache.http.client.methods.HttpPost;
import org.apache.http.impl.client.DefaultHttpClient;
import org.apache.http.message.BasicNameValuePair;
import org.apache.http.util.EntityUtils;
import org.json.JSONException;
import org.json.JSONObject;
import android.os.Bundle;
import android.app.Activity;
import android.util.Log;
import android.view.Menu;
import android.view.View;
import android.view.View.OnClickListener;
import android.widget.Button;
import android.widget.EditText;
import android.widget.Toast;
public class MainActivity extends Activity {
String url="http://10.10.6.124/androidmysql/insert.php";
//androidmysql is the project folder in your localhost
@Override
protected void onCreate(Bundle savedInstanceState) {
super.onCreate(savedInstanceState);
setContentView(R.layout.activity_main);
final EditText username=(EditText)findViewById(R.id.editText1);
final EditText pass=(EditText)findViewById(R.id.editText2);
Button reg=(Button)findViewById(R.id.button1);
reg.setOnClickListener(new OnClickListener() {
@Override
public void onClick(View arg0) {
DefaultHttpClient client = new DefaultHttpClient();
HttpPost post = new HttpPost(url);
List<NameValuePair> params = new ArrayList<NameValuePair>();
params.add(new BasicNameValuePair("username",username.getText().toString()));
params.add(new BasicNameValuePair("password",pass.getText().toString()));
try {
UrlEncodedFormEntity uefa = new UrlEncodedFormEntity(params);
post.setEntity(uefa);
HttpResponse response = client.execute(post);
HttpEntity entity = response.getEntity();
String data = EntityUtils.toString(entity);
Log.e("feedback", data);
try {
JSONObject object = new JSONObject(data);
int result = object.getInt("success");
if (result == 1) {
Toast.makeText(getApplicationContext(), "registration complete",
Toast.LENGTH_LONG).show();
}
if (result == 2) {
Toast.makeText(getApplicationContext(), "username already taken",
Toast.LENGTH_LONG).show();
}
} catch (JSONException e) {
// TODO Auto-generated catch block
e.printStackTrace();
}
} catch (ClientProtocolException e) {
// TODO Auto-generated catch block
e.printStackTrace();
} catch (IOException e) {
// TODO Auto-generated catch block
e.printStackTrace();
}
}
});
}
@Override
public boolean onCreateOptionsMenu(Menu menu) {
// Inflate the menu; this adds items to the action bar if it is present.
getMenuInflater().inflate(R.menu.main, menu);
return true;
}
}
first you need to set up php
//androidmysql is the project folder in your localhost
make sure the php file contains no html tags for better results
leave it plain
conn.php
<?php
$connect=mysql_connect("localhost","root","");
$mysql_select_db("users",$connect);
?>
dont forget to create database users and table user with username and password
here is the insert.php
<?php
include conn.php
$user=$_POST['username'];
$pass=$_POST['password'];
//these are posted fromandroid application
$sql=mysql_query("insert into user(username,password) values ('$user','$pass')");
//you are done
if($sql)
{
$output['success']=1;
json_encode($output);
print(json_encode($output))
}
if(!$sql)
{
$output['success']=2;
json_encode($output);
print(json_encode($output))
}
?>
Now lets go to android
android manifest
<?xml version="1.0" encoding="utf-8"?>
<manifest xmlns:android="http://schemas.android.com/apk/res/android"
package="com.example.anroidmysql"
android:versionCode="1"
android:versionName="1.0" >
<uses-sdk
android:minSdkVersion="8"
android:targetSdkVersion="18" />
<uses-permission android:name="android.permission.INTERNET"/>
<application
android:allowBackup="true"
android:icon="@drawable/ic_launcher"
android:label="@string/app_name"
android:theme="@style/AppTheme" >
<activity
android:name="com.example.anroidmysql.MainActivity"
android:label="@string/app_name" >
<intent-filter>
<action android:name="android.intent.action.MAIN" />
<category android:name="android.intent.category.LAUNCHER" />
</intent-filter>
</activity>
</application>
</manifest>
main layout
<RelativeLayout xmlns:android="http://schemas.android.com/apk/res/android"
xmlns:tools="http://schemas.android.com/tools"
android:layout_width="match_parent"
android:layout_height="match_parent"
android:paddingBottom="@dimen/activity_vertical_margin"
android:paddingLeft="@dimen/activity_horizontal_margin"
android:paddingRight="@dimen/activity_horizontal_margin"
android:paddingTop="@dimen/activity_vertical_margin"
tools:context=".MainActivity" >
<TextView
android:id="@+id/textView1"
android:layout_width="wrap_content"
android:layout_height="wrap_content"
android:layout_alignParentLeft="true"
android:layout_alignParentTop="true"
android:layout_marginLeft="18dp"
android:layout_marginTop="22dp"
android:text="username"
android:textAppearance="?android:attr/textAppearanceLarge" />
<EditText
android:id="@+id/editText1"
android:layout_width="wrap_content"
android:layout_height="wrap_content"
android:layout_alignLeft="@+id/textView1"
android:layout_alignParentRight="true"
android:layout_below="@+id/textView1"
android:layout_marginTop="46dp"
android:ems="10" >
<requestFocus />
</EditText>
<TextView
android:id="@+id/textView2"
android:layout_width="wrap_content"
android:layout_height="wrap_content"
android:layout_alignLeft="@+id/editText1"
android:layout_below="@+id/editText1"
android:layout_marginTop="48dp"
android:text="password"
android:textAppearance="?android:attr/textAppearanceLarge" />
<EditText
android:id="@+id/editText2"
android:layout_width="wrap_content"
android:layout_height="wrap_content"
android:layout_alignLeft="@+id/textView2"
android:layout_alignRight="@+id/editText1"
android:layout_below="@+id/textView2"
android:layout_marginTop="32dp"
android:ems="10" />
<Button
android:id="@+id/button1"
android:layout_width="wrap_content"
android:layout_height="wrap_content"
android:layout_alignLeft="@+id/editText2"
android:layout_alignRight="@+id/editText2"
android:layout_below="@+id/editText2"
android:layout_marginTop="38dp"
android:text="register" />
</RelativeLayout>
MainActivity.java
package com.example.anroidmysql;import java.io.IOException;
import java.util.ArrayList;
import java.util.List;
import org.apache.http.HttpEntity;
import org.apache.http.HttpResponse;
import org.apache.http.NameValuePair;
import org.apache.http.client.ClientProtocolException;
import org.apache.http.client.entity.UrlEncodedFormEntity;
import org.apache.http.client.methods.HttpPost;
import org.apache.http.impl.client.DefaultHttpClient;
import org.apache.http.message.BasicNameValuePair;
import org.apache.http.util.EntityUtils;
import org.json.JSONException;
import org.json.JSONObject;
import android.os.Bundle;
import android.app.Activity;
import android.util.Log;
import android.view.Menu;
import android.view.View;
import android.view.View.OnClickListener;
import android.widget.Button;
import android.widget.EditText;
import android.widget.Toast;
public class MainActivity extends Activity {
String url="http://10.10.6.124/androidmysql/insert.php";
//androidmysql is the project folder in your localhost
@Override
protected void onCreate(Bundle savedInstanceState) {
super.onCreate(savedInstanceState);
setContentView(R.layout.activity_main);
final EditText username=(EditText)findViewById(R.id.editText1);
final EditText pass=(EditText)findViewById(R.id.editText2);
Button reg=(Button)findViewById(R.id.button1);
reg.setOnClickListener(new OnClickListener() {
@Override
public void onClick(View arg0) {
DefaultHttpClient client = new DefaultHttpClient();
HttpPost post = new HttpPost(url);
List<NameValuePair> params = new ArrayList<NameValuePair>();
params.add(new BasicNameValuePair("username",username.getText().toString()));
params.add(new BasicNameValuePair("password",pass.getText().toString()));
try {
UrlEncodedFormEntity uefa = new UrlEncodedFormEntity(params);
post.setEntity(uefa);
HttpResponse response = client.execute(post);
HttpEntity entity = response.getEntity();
String data = EntityUtils.toString(entity);
Log.e("feedback", data);
try {
JSONObject object = new JSONObject(data);
int result = object.getInt("success");
if (result == 1) {
Toast.makeText(getApplicationContext(), "registration complete",
Toast.LENGTH_LONG).show();
}
if (result == 2) {
Toast.makeText(getApplicationContext(), "username already taken",
Toast.LENGTH_LONG).show();
}
} catch (JSONException e) {
// TODO Auto-generated catch block
e.printStackTrace();
}
} catch (ClientProtocolException e) {
// TODO Auto-generated catch block
e.printStackTrace();
} catch (IOException e) {
// TODO Auto-generated catch block
e.printStackTrace();
}
}
});
}
@Override
public boolean onCreateOptionsMenu(Menu menu) {
// Inflate the menu; this adds items to the action bar if it is present.
getMenuInflater().inflate(R.menu.main, menu);
return true;
}
}
Wednesday, 17 July 2013
BlueStack Emulator Set UP
1.DOWNLOAD BLUESTACK APPLICATION FROM
(link:http://www.bluestack.com)
install blue stack on your host machine
if you start bluestack before eclipse and run your project , blue stack will automatically be available as
an adb device
2.if you exit any of the two connection may be terminated and be forced to make a new connection using this command
adb connect 127.0.0.1
access your platfoam-tool folder and start command inside there by pressing
CTRL+RIGHT-CLICK
then choose open command here option
and type the command inside there
adb connect 127.0.0.1

you should see successfully connected at 127.0.0.1:5555
then you are done configuring this simple emulator and start firing things up
thanx good luck
(link:http://www.bluestack.com)
install blue stack on your host machine
if you start bluestack before eclipse and run your project , blue stack will automatically be available as
an adb device
2.if you exit any of the two connection may be terminated and be forced to make a new connection using this command
adb connect 127.0.0.1
access your platfoam-tool folder and start command inside there by pressing
CTRL+RIGHT-CLICK
then choose open command here option
and type the command inside there
adb connect 127.0.0.1
you should see successfully connected at 127.0.0.1:5555
then you are done configuring this simple emulator and start firing things up
thanx good luck
Friday, 12 July 2013
Android Custome Listview with images
in this tutorial you just need to create a project and copy all these codes and place them where they are supposed to be and you will have no trouble the main and custome put them in your layout folder and enjoy
thanx for watching my example
MAIN JAVA CLASS
ListView2Activity .java
package com.listview;
import android.app.Activity;
import android.os.Bundle;
import android.view.View;
import android.widget.AdapterView;
import android.widget.ListView;
import android.widget.Toast;
import android.widget.AdapterView.OnItemClickListener;
public class ListView2Activity extends Activity implements OnItemClickListener
{
/** Called when the activity is first created. */
ListView lview;
ListViewAdapter lviewAdapter;
private final static String month[] = {"January","February","March","April","May",
"June","July","August","September","October","November","December"};
private final static String number[] = {"Month - 1", "Month - 2","Month - 3",
"Month - 4","Month - 5","Month - 6",
"Month - 7","Month - 8","Month - 9",
"Month - 10","Month - 11","Month - 12"};
private final static String sayings[]={"Hunger","Rain","Love","Sex","Summer","poverty","Autum","what","yelling","News","Terror","Snow"};
@Override
public void onCreate(Bundle savedInstanceState) {
super.onCreate(savedInstanceState);
setContentView(R.layout.main);
lview = (ListView) findViewById(R.id.listView2);
lviewAdapter = new ListViewAdapter(this, month, number);
System.out.println("adapter => "+lviewAdapter.getCount());
lview.setAdapter(lviewAdapter);
lview.setOnItemClickListener(this);
}
public void onItemClick(AdapterView<?> arg0, View arg1, int position, long id) {
// TODO Auto-generated method stub
Toast.makeText(getApplicationContext(), month[position]+"\t is the month of \t"+sayings[position], Toast.LENGTH_LONG).show();
//Toast.makeText(this,"Title => "+month[position]+"=> n Description"+number[position], Toast.LENGTH_SHORT).show();
}
}
thanx for watching my example
MAIN JAVA CLASS
ListView2Activity .java
package com.listview;
import android.app.Activity;
import android.os.Bundle;
import android.view.View;
import android.widget.AdapterView;
import android.widget.ListView;
import android.widget.Toast;
import android.widget.AdapterView.OnItemClickListener;
public class ListView2Activity extends Activity implements OnItemClickListener
{
/** Called when the activity is first created. */
ListView lview;
ListViewAdapter lviewAdapter;
private final static String month[] = {"January","February","March","April","May",
"June","July","August","September","October","November","December"};
private final static String number[] = {"Month - 1", "Month - 2","Month - 3",
"Month - 4","Month - 5","Month - 6",
"Month - 7","Month - 8","Month - 9",
"Month - 10","Month - 11","Month - 12"};
private final static String sayings[]={"Hunger","Rain","Love","Sex","Summer","poverty","Autum","what","yelling","News","Terror","Snow"};
@Override
public void onCreate(Bundle savedInstanceState) {
super.onCreate(savedInstanceState);
setContentView(R.layout.main);
lview = (ListView) findViewById(R.id.listView2);
lviewAdapter = new ListViewAdapter(this, month, number);
System.out.println("adapter => "+lviewAdapter.getCount());
lview.setAdapter(lviewAdapter);
lview.setOnItemClickListener(this);
}
public void onItemClick(AdapterView<?> arg0, View arg1, int position, long id) {
// TODO Auto-generated method stub
Toast.makeText(getApplicationContext(), month[position]+"\t is the month of \t"+sayings[position], Toast.LENGTH_LONG).show();
//Toast.makeText(this,"Title => "+month[position]+"=> n Description"+number[position], Toast.LENGTH_SHORT).show();
}
}
here is the list view adapter that extends the Baseadapter class to handle the images
package com.listview;
import android.app.Activity;
import android.view.LayoutInflater;
import android.view.View;
import android.view.ViewGroup;
import android.widget.BaseAdapter;
import android.widget.ImageView;
import android.widget.TextView;
public class ListViewAdapter extends BaseAdapter
{
Activity context;
String title[];
String description[];
public ListViewAdapter(Activity context, String[] title, String[] description) {
super();
this.context = context;
this.title = title;
this.description = description;
}
public int getCount() {
// TODO Auto-generated method stub
return title.length;
}
public Object getItem(int position) {
// TODO Auto-generated method stub
return null;
}
public long getItemId(int position) {
// TODO Auto-generated method stub
return 0;
}
private class ViewHolder {
TextView txtViewTitle;
TextView txtViewDescription;
ImageView image;
TextView quotes;
}
public View getView(int position, View convertView, ViewGroup parent)
{
// TODO Auto-generated method stub
ViewHolder holder;
LayoutInflater inflater = context.getLayoutInflater();
if (convertView == null)
{
convertView = inflater.inflate(R.layout.listitem_row, null);
holder = new ViewHolder();
holder.txtViewTitle = (TextView) convertView.findViewById(R.id.textView1);
holder.txtViewDescription = (TextView) convertView.findViewById(R.id.textView2);
holder.image=(ImageView)convertView.findViewById(R.id.imageView1);
holder.quotes=(TextView)convertView.findViewById(R.id.quotes);
convertView.setTag(holder);
}
else
{
holder = (ViewHolder) convertView.getTag();
}
holder.txtViewTitle.setText(title[position]);
holder.txtViewDescription.setText(description[position]);
holder.image.setBackgroundResource(images[position]);
holder.quotes.setText(sayings[position]);
//holder.image.setImageResource(R.drawable.ic_launcher);
return convertView;
}
private final static String sayings[]={"Hunger","Rain","Love","Sex","Summer","poverty","Autum","what","yelling","News","Terror","Snow"};
private Integer[] images={R.raw.brightday,R.drawable.ic_launcher,R.raw.sunlaugh,R.raw.stormcloud,R.raw.hotsun,R.raw.brightday,R.raw.eveningcloud,R.raw.cloudlove,R.raw.springs,R.raw.stormcloud,R.raw.xmas,R.raw.cloudwhite};
}
main.xml
<?xml version="1.0" encoding="utf-8"?>
<LinearLayout xmlns:android="http://schemas.android.com/apk/res/android"
android:orientation="vertical"
android:layout_width="fill_parent"
android:layout_height="fill_parent">
<ListView
android:layout_height="wrap_content"
android:id="@+id/listView2"
android:layout_width="match_parent">
</ListView>
</LinearLayout>
then the custom xml
<?xml version="1.0" encoding="utf-8"?>
<LinearLayout
xmlns:android="http://schemas.android.com/apk/res/android"
android:orientation="vertical"
android:layout_width="match_parent"
android:layout_height="match_parent">
<TextView
android:id="@+id/textView1"
android:layout_width="wrap_content"
android:layout_height="wrap_content"
android:text="TextView"
android:textAppearance="?android:attr/textAppearanceLarge" >
</TextView>
<TextView
android:id="@+id/textView2"
android:layout_width="wrap_content"
android:layout_height="wrap_content"
android:text="TextView" >
</TextView>
<ImageView
android:id="@+id/imageView1"
android:layout_width="wrap_content"
android:layout_height="wrap_content" />
<TextView
android:id="@+id/quotes"
android:layout_width="wrap_content"
android:layout_height="wrap_content"
android:text="Large Text"
android:layout_marginLeft="200dp"
android:layout_marginBottom="100dp"
android:textAppearance="?android:attr/textAppearanceLarge" />
</LinearLayout>
Thursday, 11 July 2013
ANDROID RETRIEVING DATA FROM MYSQL DATABASE
first things first
create a table called
student
having fields NAME and YEAR and AGE from your php mypublicadmin
2.create a php file index.php
<?php
header('Content-type: application/json');
mysql_connect("127.0.0.1","root","");
mysql_select_db("android");
$sql=mysql_query("select * from students");
while($row=mysql_fetch_assoc($sql))
$output[]=$row;
json_encode($output);
print(json_encode($output));
mysql_close();
?>
then after this go to eclipse MAINACTIVITY and add this
package com.example.httpclient;
import java.io.IOException;
import java.util.ArrayList;
import java.util.List;
import org.apache.http.HttpEntity;
import org.apache.http.HttpResponse;
import org.apache.http.client.ClientProtocolException;
import org.apache.http.client.methods.HttpGet;
import org.apache.http.impl.client.DefaultHttpClient;
import org.apache.http.util.EntityUtils;
import org.json.JSONArray;
import org.json.JSONException;
import org.json.JSONObject;
import android.app.Activity;
import android.os.Bundle;
import android.os.StrictMode;
import android.util.Log;
import android.widget.ArrayAdapter;
import android.widget.ListView;
import android.widget.TextView;
public class HTTPCLIENT extends Activity {
TextView text;
@Override
public void onCreate(Bundle savedInstanceState) {
super.onCreate(savedInstanceState);
setContentView(R.layout.activity_httpclient);
StrictMode.ThreadPolicy policy = new StrictMode.ThreadPolicy.Builder().permitAll().build();
StrictMode.setThreadPolicy(policy);
connect();
}
private void connect() {
String data;
List<String> r = new ArrayList<String>();
ArrayAdapter<String>adapter=new ArrayAdapter<String>(getApplicationContext(), android.R.layout.simple_list_item_1,r);
ListView list=(ListView)findViewById(R.id.listView1);
try {
DefaultHttpClient client = new DefaultHttpClient();
HttpGet request = new HttpGet("http://10.10.6.124/android/index.php");
HttpResponse response = client.execute(request);
HttpEntity entity=response.getEntity();
data=EntityUtils.toString(entity);
Log.e("STRING", data);
try {
JSONArray json=new JSONArray(data);
for(int i=0;i<json.length(); i++)
{
JSONObject obj=json.getJSONObject(i);
String name=obj.getString("name");
String year=obj.getString("year");
String age=obj.getString("age");
Log.e("STRING", name);
r.add(name);
r.add(year);
r.add(age);
list.setAdapter(adapter);
}
} catch (JSONException e) {
// TODO Auto-generated catch block
e.printStackTrace();
}
} catch (ClientProtocolException e) {
Log.d("HTTPCLIENT", e.getLocalizedMessage());
} catch (IOException e) {
Log.d("HTTPCLIENT", e.getLocalizedMessage());
}
}
}
create a table called
student
having fields NAME and YEAR and AGE from your php mypublicadmin
2.create a php file index.php
<?php
header('Content-type: application/json');
mysql_connect("127.0.0.1","root","");
mysql_select_db("android");
$sql=mysql_query("select * from students");
while($row=mysql_fetch_assoc($sql))
$output[]=$row;
json_encode($output);
print(json_encode($output));
mysql_close();
?>
then after this go to eclipse MAINACTIVITY and add this
package com.example.httpclient;
import java.io.IOException;
import java.util.ArrayList;
import java.util.List;
import org.apache.http.HttpEntity;
import org.apache.http.HttpResponse;
import org.apache.http.client.ClientProtocolException;
import org.apache.http.client.methods.HttpGet;
import org.apache.http.impl.client.DefaultHttpClient;
import org.apache.http.util.EntityUtils;
import org.json.JSONArray;
import org.json.JSONException;
import org.json.JSONObject;
import android.app.Activity;
import android.os.Bundle;
import android.os.StrictMode;
import android.util.Log;
import android.widget.ArrayAdapter;
import android.widget.ListView;
import android.widget.TextView;
public class HTTPCLIENT extends Activity {
TextView text;
@Override
public void onCreate(Bundle savedInstanceState) {
super.onCreate(savedInstanceState);
setContentView(R.layout.activity_httpclient);
StrictMode.ThreadPolicy policy = new StrictMode.ThreadPolicy.Builder().permitAll().build();
StrictMode.setThreadPolicy(policy);
connect();
}
private void connect() {
String data;
List<String> r = new ArrayList<String>();
ArrayAdapter<String>adapter=new ArrayAdapter<String>(getApplicationContext(), android.R.layout.simple_list_item_1,r);
ListView list=(ListView)findViewById(R.id.listView1);
try {
DefaultHttpClient client = new DefaultHttpClient();
HttpGet request = new HttpGet("http://10.10.6.124/android/index.php");
HttpResponse response = client.execute(request);
HttpEntity entity=response.getEntity();
data=EntityUtils.toString(entity);
Log.e("STRING", data);
try {
JSONArray json=new JSONArray(data);
for(int i=0;i<json.length(); i++)
{
JSONObject obj=json.getJSONObject(i);
String name=obj.getString("name");
String year=obj.getString("year");
String age=obj.getString("age");
Log.e("STRING", name);
r.add(name);
r.add(year);
r.add(age);
list.setAdapter(adapter);
}
} catch (JSONException e) {
// TODO Auto-generated catch block
e.printStackTrace();
}
} catch (ClientProtocolException e) {
Log.d("HTTPCLIENT", e.getLocalizedMessage());
} catch (IOException e) {
Log.d("HTTPCLIENT", e.getLocalizedMessage());
}
}
}
xml file
<RelativeLayout xmlns:android="http://schemas.android.com/apk/res/android"
xmlns:tools="http://schemas.android.com/tools"
android:layout_width="match_parent"
android:layout_height="match_parent"
android:paddingBottom="@dimen/activity_vertical_margin"
android:paddingLeft="@dimen/activity_horizontal_margin"
android:paddingRight="@dimen/activity_horizontal_margin"
android:paddingTop="@dimen/activity_vertical_margin"
tools:context=".HTTPCLIENT" >
<ListView
android:id="@+id/listView1"
android:layout_width="match_parent"
android:layout_height="wrap_content"
android:layout_alignParentLeft="true"
android:layout_alignParentTop="true" >
</ListView>
</RelativeLayout>
in your manifest add permissions to internet
<?xml version="1.0" encoding="utf-8"?>
<manifest xmlns:android="http://schemas.android.com/apk/res/android"
package="com.example.httpclient"
android:versionCode="1"
android:versionName="1.0" >
<uses-sdk
android:minSdkVersion="9"
android:targetSdkVersion="17" />
<uses-permission android:name="android.permission.INTERNET"/>
<application
android:allowBackup="true"
android:icon="@drawable/ic_launcher"
android:label="@string/app_name"
android:theme="@style/AppTheme" >
<activity
android:name="com.example.httpclient.HTTPCLIENT"
android:label="@string/app_name" >
<intent-filter>
<action android:name="android.intent.action.MAIN" />
<category android:name="android.intent.category.LAUNCHER" />
</intent-filter>
</activity>
</application>
</manifest>
and thats all if this fails then change your operating system hhahahahahahahahahaha
Friday, 5 July 2013
Google map api v2 keys not working
your manifest should look like this okay
where you see my package name replace it with yours and things should work
if you see a blank screen with gestures enabled there are two things that are not right
data connection problems
and the api key
so make sure you run the app on a real device not an emulator and fail not to import the lib project from the sdk-extra folder
<?xml version="1.0" encoding="utf-8"?>
<manifest xmlns:android="http://schemas.android.com/apk/res/android"
package="com.icytreygooglemap.mymap"
android:versionCode="1"
android:versionName="1.0" >
<uses-sdk
android:minSdkVersion="8"
android:targetSdkVersion="17" />
<permission
android:name="com.icytreygooglemap.mymap.permission.MAPS_RECEIVE"
android:protectionLevel="signature" />
<uses-permission android:name="om.icytreygooglemap.mymap.permission.MAPS_RECEIVE" />
<uses-permission android:name="android.permission.INTERNET" />
<uses-permission android:name="android.permission.WRITE_EXTERNAL_STORAGE" />
<uses-permission android:name="android.permission.ACCESS_COARSE_LOCATION" />
<uses-permission android:name="android.permission.ACCESS_FINE_LOCATION" />
<uses-permission android:name="com.google.android.providers.gsf.permission.READ_GSERVICES" />
<application
android:allowBackup="true"
android:icon="@drawable/ic_launcher"
android:label="@string/appname"
android:theme="@style/AppTheme" >
<activity
android:name="com.icytreygooglemap.mymap.Google"
android:label="@string/appname" >
<intent-filter>
<action android:name="android.intent.action.MAIN" />
<category android:name="android.intent.category.LAUNCHER" />
</intent-filter>
</activity>
<meta-data
android:name="com.google.android.maps.v2.API_KEY"
android:value="my key i put it just removed it"></meta-data>
</application>
<uses-feature
android:glEsVersion="0x00020000"
android:required="true" />
</manifest>
where you see my package name replace it with yours and things should work
if you see a blank screen with gestures enabled there are two things that are not right
data connection problems
and the api key
so make sure you run the app on a real device not an emulator and fail not to import the lib project from the sdk-extra folder
<?xml version="1.0" encoding="utf-8"?>
<manifest xmlns:android="http://schemas.android.com/apk/res/android"
package="com.icytreygooglemap.mymap"
android:versionCode="1"
android:versionName="1.0" >
<uses-sdk
android:minSdkVersion="8"
android:targetSdkVersion="17" />
<permission
android:name="com.icytreygooglemap.mymap.permission.MAPS_RECEIVE"
android:protectionLevel="signature" />
<uses-permission android:name="om.icytreygooglemap.mymap.permission.MAPS_RECEIVE" />
<uses-permission android:name="android.permission.INTERNET" />
<uses-permission android:name="android.permission.WRITE_EXTERNAL_STORAGE" />
<uses-permission android:name="android.permission.ACCESS_COARSE_LOCATION" />
<uses-permission android:name="android.permission.ACCESS_FINE_LOCATION" />
<uses-permission android:name="com.google.android.providers.gsf.permission.READ_GSERVICES" />
<application
android:allowBackup="true"
android:icon="@drawable/ic_launcher"
android:label="@string/appname"
android:theme="@style/AppTheme" >
<activity
android:name="com.icytreygooglemap.mymap.Google"
android:label="@string/appname" >
<intent-filter>
<action android:name="android.intent.action.MAIN" />
<category android:name="android.intent.category.LAUNCHER" />
</intent-filter>
</activity>
<meta-data
android:name="com.google.android.maps.v2.API_KEY"
android:value="my key i put it just removed it"></meta-data>
</application>
<uses-feature
android:glEsVersion="0x00020000"
android:required="true" />
</manifest>
Androidians We Rule
welcome to my android codesnipping blog
Hope this whole thing really helps you okay
we are android/google ugandan developers trying to make sure our applications sell okay
so any other person with the same objectives and aims is welcome to the page okay
hope you enjoy it
Good luck
Subscribe to:
Posts (Atom)